|
|
The Long Riders Guild Academic Foundation |
|
|
Equestrian Wisdom & History Books Astonishing Rides, Rescues & Races
Website designed by Basha O'Reilly
|
Saddling For the 21st Century - Page 2 3,000 Miles—An Adventure and an Education
Now that we have
swallowed a dose of reality about how our saddles evolved and have begun to
question them, must we give up in defeat? Must we accept that there is nothing
else on the market to use on our horses’ backs, and that as long as everyone
else is settling for today’s saddles, at least we are doing no worse than the
next fellow?
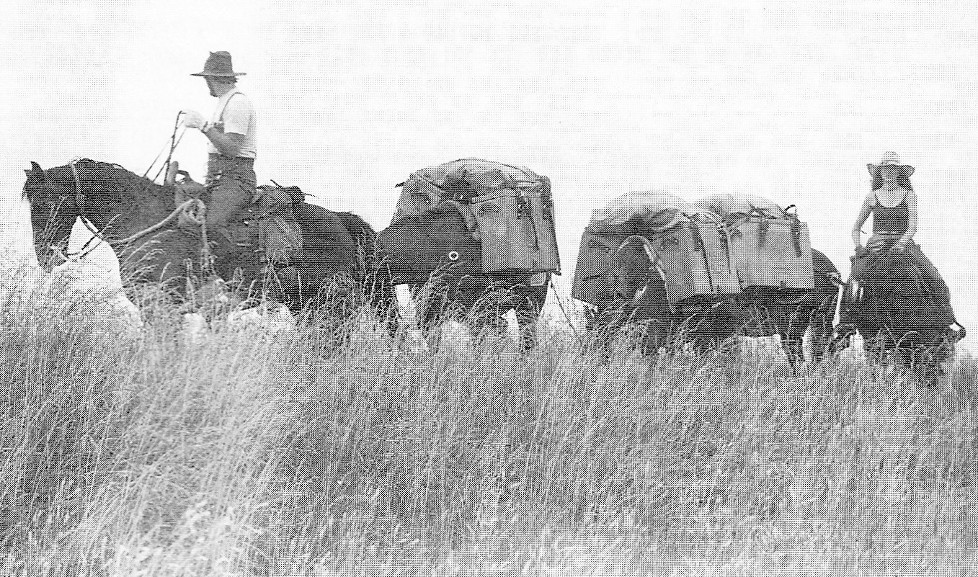
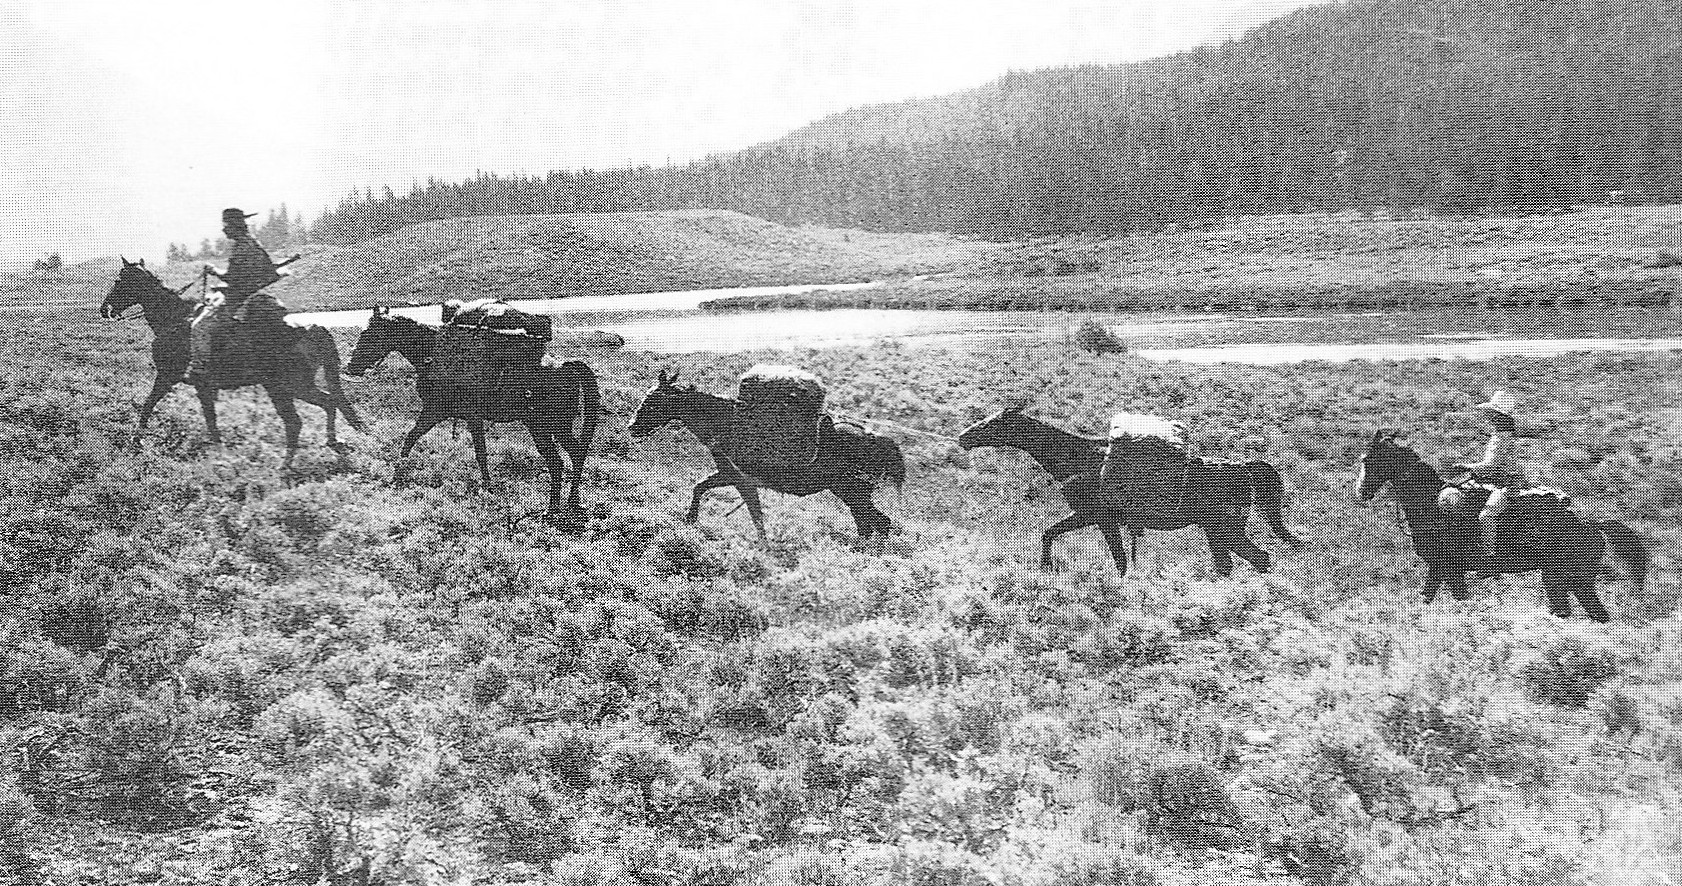
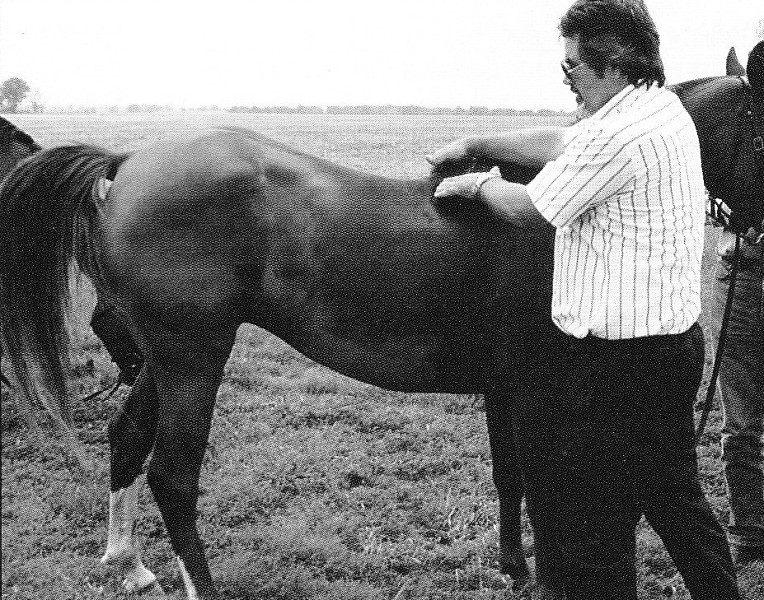
Before the trip, our horses had never seen pine trees, smelled bear or been out of the sight of fences. In the early weeks, they were nervous all day, every day. They had depended on their Missouri farmstead and each other for comfort all their lives. Now, all they had was each other—the herd. What once had been five docile, well-trained horses, became five snorting, white-eyed, creatures sporting layers of unnecessary fat they would lose soon enough. Their nervousness in the early days of the trip caused us to miss signals that they were uncomfortable once we started traveling five and six days per week. We learned a few things the hard way. We never tied the horses in the pack string in any order other than their natural pecking order. Otherwise, vicious fights broke out. I also learned the consequences of allowing anything but perfect respect and plenty of distance from my horse when I was leading it. I often had to lead all five horses at once. The pain I could inflict if they came even close to my heels was enough to make them shy and squint their eyes, until they learned to pay more attention to me than anything else and mind their manners. By the end of the first 500 miles, the horses respected us, but they continually fought with each other, even after we learned to arrange them by their own pecking order. As time went on, they no longer would walk in a straight line along roads, and while tied outside a grocery store, they could be counted on to mingle around until they twisted up their leads causing what high-country packers call “a wreck.” Fortunately, none of the horses ever was hurt this way, but we wondered where our even-tempered, sensible horses had gone. Charlie, Len’s riding horse, was the worst. As Len led the pack string, Charlie continually tossed his head, fought the bit, and tried to pull the pack string too fast. It was not until Charlie shot up a 45-degree embankment and nearly spilled over backwards with Len that we learned our horses had more wrong with them than bad attitudes. When Len tried to sell Charlie to an old Mexican-American rancher, the experienced horseman told Len his horse was sore under saddle. That was the saddle Len had hand-made for the trip. “I don’t think so,” Len said defensively.
Charlie was sore.
The gentleman cracked open the door of our understanding and the light came
flooding in. He taught us how to use fingertip palpation to detect fluid just
under the surface of Charlie’s skin caused by bruising from Len’s saddle. It
was not visible; it was slight “squishiness” to gentle touch. Len took some
time to understand exactly why Charlie suffered bruising on the sides of his
withers from a mechanical standpoint. He realized that two factors caused it.
First, the saddle skirts in the gullet of the fork (front of the western saddle)
created irritating ridges. Once he noticed the effect they were having on
Charlie’s withers, he quickly skived them away with a knife to form a smooth
surface. Second, Len’s innate engineering ability allowed him also to see
something important that many saddlers never notice. The way his saddle was
rigged caused it to rest too far forward on Charlie’s back. He cut and
repositioned the rigging to keep the saddle behind Charlie’s shoulders. The
next day, Len had a new horse. Overnight, Charlie was cured. He quit fighting
the bit, quit tossing his head, and walked calmly. (He always walked too fast
for leading the pack string, but that is another story.)
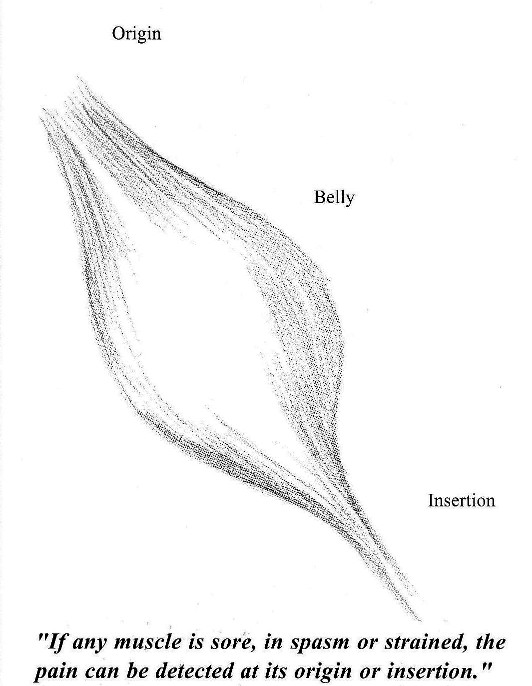
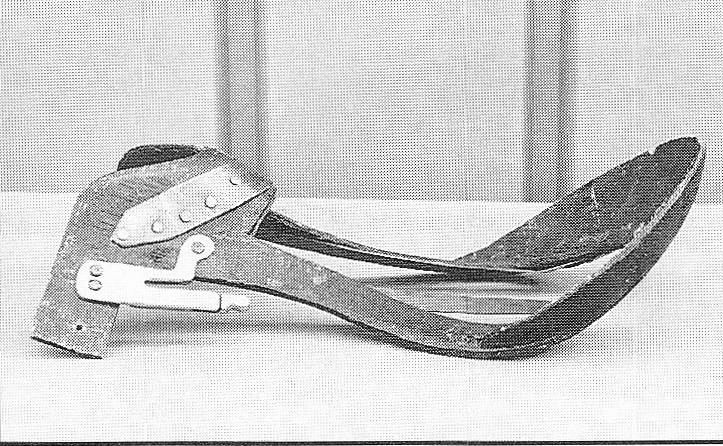
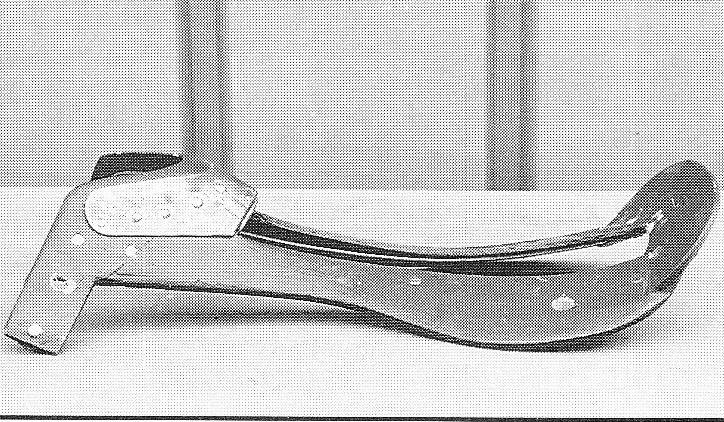
Over the next 200 miles, we repeatedly re-shaped the pack saddle bars. We shaved and widened the gullets with a hoof rasp, but these tactics did not solve our pack horses’ problems. The same thin layer of edema from bruising was there at the end of the day. At the close of a one-week rest period, the horses’ backs were firm as a yearling’s, but at the close of just one riding day, the edema was back. Len’s saddle no longer caused Charlie any problem, but Charlie’s bruising had been high on the sides of his withers. It had been caused by a ridge of saddle skirting that caused pressure points, and the saddle’s riding too far forward. The pack horses did not have trouble on the sides of their withers. Their problem was just behind the shoulders on both sides. Why didn’t Charlie have bruising in the same place as the other horses? Len took another look at his own saddle, because now it was working perfectly. It was not made in traditional western fashion. Len had designed his saddle skirts differently. Under normal circumstances, Western saddle skirts are comprised of leather and fleece attached to the underside of the wooden saddle tree bars, concealing the wood bars from view. Saddle skirts roughly correspond to panels on English saddles; however they are not intended to be padded as with English saddles. In normal Western saddle construction, these saddle skirts do nothing more than hide the tree and attach the sheepskin or fleece to the underside of the saddle. They are molded to the shape of the tree and nailed in place. As far as saddle fit is concerned, skirts are cosmetic. Len’s skirts, on the other hand were made with thick layers of leather that approximated the shape of the tree, but actually expanded the weight bearing surface of the tree, because of their stiffness and size. His common sense told him when he was making the saddle before the trip, that there should be a thick leather transition from the rigid wood tree to the horse’s back. Thankfully for us, Len was not formally schooled in the art of saddle making, or he might never have tried this. When Len realized that his own saddle was not causing the same problem as the pack saddles, he knew the reason. His thick leather skirts were doubling the weight-bearing surface of his tree, and reducing the pounds per square inch, which prevented bruising. Making the same large, thick skirts for all the pack saddles was our only hope. If this did not work, we would summon family with horse trailers to come and take us home. We had vowed at the outset of our journey that we would end the trip before hurting our horses. We made camp in the West Delores River valley at Billy Joe Moffat’s Paradise Ranch, and gratefully accepted his generous hospitality and the long drive to town for leather. Three days later, our pack saddles were fastened with new, big, thick skirts that made a flexible, expansive transition between on our horses’ backs and the rigid trees. We held our breaths as we rode away from Paradise with our pack string. Then something happened that would change our lives forever. Our five horses put their heads down and peacefully walked one behind the other in a straight line. From that moment forward, they ceased fighting. They could all be counted on to stand quietly while tied to a single light pole outside a grocery store, and I never again had to ride up beside the pack string with a quirt and scold them back into line. The tense, hooded expressions left their faces to be replaced by the same, contented expressions we used to see on their faces in the pasture at 10:30 in the morning on a sunny summer day. We had been punishing them, yelling at them, and abusing them into submission, and we were very, very sorry for it. Our horses had been trying in every way they could conceive, to tell us they were hurting, and they needed us to stop and help them. Why they did not hurt or kill us for what we were putting them through, I will never understand. At home, other high-level competition horses were suffering just as much. When we returned from our adventure, Len and I were shocked to see the same, pained expressions on the faces of our colleagues’ endurance and competitive trail riding horses. They demonstrated the same body carriage and bad behaviors our horses had displayed before we had solved their saddle problems. Our friends were oblivious to their suffering, just as we had been. Len and I embarked on an unplanned crusade to help all horses that were suffering from man’s invention for man—the saddle. Len and I eventually patented our solution, using high-tech materials and concepts, and we called our solution Ortho-Flex® saddles. In the ensuing 20 years we made and sold more than 20,000 saddles around the world for top competitors and for trail riders who rode bareback and saved two years before they would put anything but an Ortho-Flex® on their horse. Ortho-Flex® Saddle Company evolved, and today, Len produces a new concept saddle device that allows horsemen to use their own saddle with his CorrecTor®, to accomplish what our horses told us they needed so long ago on our cross-country trek. His creation of the CorrecTor® may be one of the products of which I am most proud, because it is affordable for any horse lover, which means that any horse that needs help can receive it. While I cannot not specifically endorse it, I believe it may help many horses. I no longer am involved in making and selling saddles and equipment, or promoting any particular product, but I still carry the torch for horses by educating riders. I am a writer who still is passionate about preserving the comfort and soundness of the horse—in my opinion the most forbearing and beautiful of creatures. Sound or Sore? How to Tell if Your Horse’s Back is Sore It isn’t enough to claim our saddle doesn’t hurt our horse, just because we see no pathology on the surface of the skin. We must evaluate our horse’s behavior and movement; then palpate its back for soreness. Evaluation of behavior for possible saddle problems: This process is intuitive, but also critical. Certain behaviors are common among horses that suffer pain from their saddles. The truth is, it is hard to know that pain from the saddle is the cause of behavior problems, because no one rides without a saddle. So many horses suffer discomfort that certain behaviors, while annoying, seem inevitable. Once you have ruled out dentistry and shoeing as possible causes of bad behavior and performance, the following acts of disobedience are often directly linked to pain from a saddle, or the anticipation of it: 1. Does your horse resist being caught, act ticklish over the back, dip its back when brushed, act “cold-backed,” or buck when first saddled? 2. When girthed, does it dip, sidestep, or rear in the absence of obvious girth chaffing? 3. Does it refuse to stand still when mounted? Does it move constantly, rather than standing quietly after mounting? Does it dip its back and throw up its head, regardless how carefully it is mounted? 4. Does it have a history of hitting riders in the face with its head, and does it flip its nose while being ridden? 5. Does it have difficulty walking calmly on a long rein, becoming more impatient as a training session or ride progresses, rather than becoming calmer? 6. Does it have difficulty taking a particular lead or flexing its neck around to one or both sides without taking a step forward? 7. Does it “track up” more on one side in the rear than the other, and do its gaits appear uneven? Does it suffer illusive lameness the rider can feel, but that no one else can easily see? These all are symptoms of pain caused by a saddle. Probe for telltale soreness in the checkpoint muscles: This section will describe how to determine if your horse has been locking his back down due to pain from his saddle. If he has been traveling with his back locked down (dorsiflexed or dipped), muscle groups throughout his body will be tense and sore. For example, if the horse suffers pressure points at the shoulder, it will travel in a hollow frame, rendering related muscles unable to fully relax down the shoulder, and farther down the back. This places pressure and soreness at the points where muscles attach to bones and tendons.
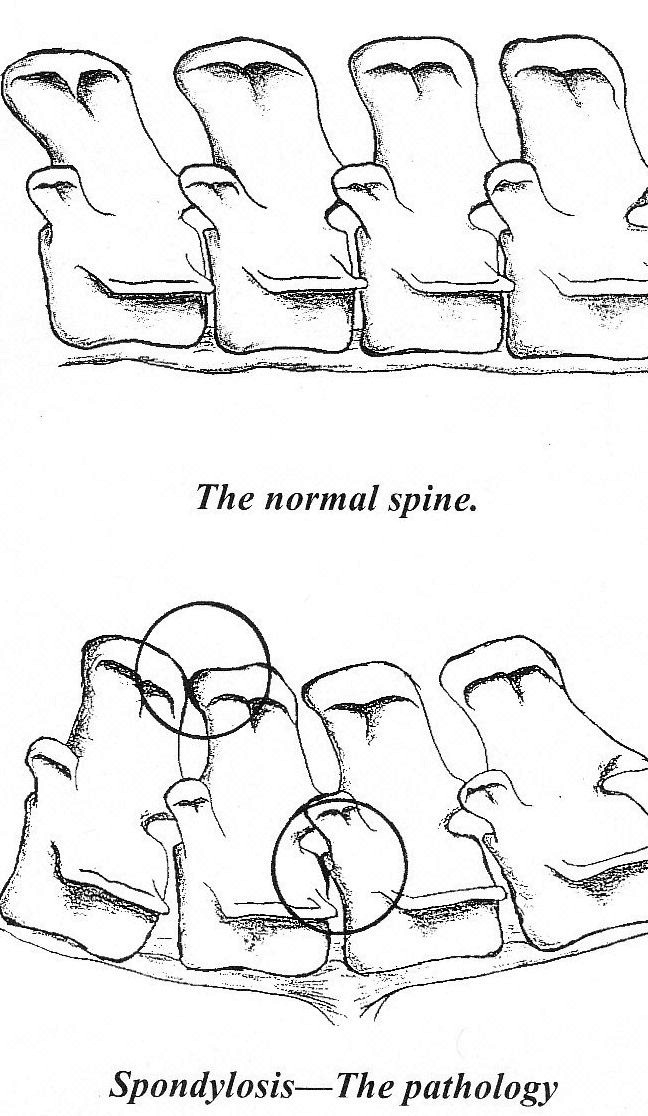
Remember that most riders use enough padding and rest their horses enough to prevent bruising to become visible on the surface of the skin; meanwhile, the horse feels enough pain to limit his effort and stride. These horses tense the muscles that are being pressed upon by the saddle. This tension flows to all connected muscle groups. The horse operates in a tense and unnatural frame, and this places stress on other parts of his body which one might never believe could be affected by the saddle. The three checkpoint muscles we will focus on are the semimembranosis (on either side of the tail in the hindquarters), the brachiosephalicus (following the lower half of the neck from the poll to the shoulder), and the triceps at the elbow. Many other muscles also could be probed, but these three are all you need to make a trustworthy diagnosis. You will poke these muscles quickly and sharply with the ends of three fingers or your thumb held stiff. If this action seems too invasive, please remember that the force of the bite or kick your horse is likely to receive in a herd environment is far greater than any force you could exert by using the ends of your fingers, however sharply. You will not injure your horse in any way by this probing. If your horse is sore at these checkpoints, his muscle will jump dramatically when probed in this way. You will see an unusually strong reaction to this probing. Most novices probe too softly to illicit a reaction from their horse and are left with the impression their horse’s muscles are relaxed. TTEAM therapy inventor, Linda Tellington-Jones, once stated that one must probe as firmly as necessary to get a reaction to see if the horse is sore. She sometimes probes very strongly. If there is no soreness, there will be little response to vigorous probing. Checkpoint: Semimembranosis at either side of the base of the tail: The semimembranosis muscle originates on either side of the root of the tail. It is a long and rather narrow muscle which runs down the back of the hindquarters beside the tail that attaches five to eight inches above the horse’s hock. If the horse is traveling with its back dipped and its head up, the checkpoint at the top of this muscle beside the root of the tail will be sore. Standing to the side of the horse’s hindquarters, probe sharply with the tips of your first three fingers into the muscle’s origin beside the base of the tail. The muscle should feel loose and relaxed or “quiescent.” The horse should react by slightly tucking his hindquarters and slightly raising his back—both natural reflexes. If he is tense from soreness under saddle, he will hump his back and tuck his hindquarters quite violently, and he may even hop with both hind legs. If so, he probably has been traveling with his back clenched from pain caused by the saddle for quite some time. Checkpoint: Brachiosephalicus from the poll to the shoulder covering the length of the neck—lower half. Probe the base of the neck in front of the shoulder blade about five inches above the point of the shoulder. This muscle can be overworked when your horse travels with its head high, which is caused by his back being locked down due to pain from the saddle. If your horse is sore under saddle, this muscle will jerk visibly when probed, and the horse will probably step away from you or turn his head toward you, curving his neck away. He may even bend away while many related and attached muscles jerk throughout his neck and shoulder. A horse that is not suffering tension in these muscles will show some slight jerking as a natural reaction to the probing. Checkpoint: Triceps which forms a wedge from the shoulder blade, rearward to the elbow. You will feel this muscle as the fleshy area just to the rear of the bony ridge of the shoulder blade. Probe just above the bony protrusion of the elbow. If your horse is sore, his muscle will jerk dramatically, he may move away, and he may bend his knee. The amount of violence with which he jerks depends on how sore and locked down his back is. If he is not in spasm from operating in pain from his saddle, his muscle will be flaccid when probed. Palpating the Saddle Area for Soreness This section will teach the key areas of the back to palpate for soreness, caused by direct pressure from the saddle. There are three types of soreness to look for: 1) deep muscle soreness caused by excess pressure in a concentrated area; 2) friction soreness caused by movement of the horse under the saddle and stirrup straps; 3) impingement of the spinal processes, also known as spondylosis, caused by jumping, rider concussion, or the horse’s traveling with his back muscles in contraction. The best setting for palpating your horse:
What to watch for: When palpating, look for your horse to react in one or more of the following ways. He may raise its head, dip its back, flatten its croup, step away from you, toss its head, pin its ears, or flick its hide where you are palpating it, as if it is ridding itself of a fly. Your horse may tense the muscles around your fingers, and its muscles may shudder in the area you are probing. Remember to study its face as you are working. It may only tighten its lips, clinch its teeth, or have a steely expression around its eyes. When you hit a muscle in spasm, your horse will react with pain, and one of the best ways to distinguish a painful reaction from a ticklish response is by looking at the horse’s face. A note about probing the seasoned, older horse: Many older horses will not readily admit that they are hurting. From the time they are young, horses are taught how to perform despite saddle discomfort. This type of horse is an old professional (“old pro”) at blocking pain, and unless you do it right, you will not be able to get a reaction from it, even if its muscles are in spasm. Approach the horse and probe one of the key areas without warning, firmly with three fingers. If the horse is sore or in spasm its back will dip and its head will come up. The old pro that regularly blocks pain may not react again to further probing. What if my horse is just ticklish and not really sore? The thin-skinned, “ticklish” horse may squirm a bit when probed and flick his skin, but these reactions will dissipate after you have held the pressure several seconds. If it is truly sore the horse will dip its back, raise its head, its muscles may shudder around your fingers, and it will try to bend away from you. How to probe: When probing for deep muscle bruising, you will use firm, inward pressure, which is different from the quick poking action you used when you probed the checkpoint muscles in the previous section of this article. To assess deep muscle soreness, you will use a firm, steady inward pressure of 20 to 25 pounds for about ten sections with the tips of your first three fingers or with your thumb. Try pushing your bathroom scales to learn the correct amount of pressure. Why hold the pressure a full 10 seconds? There may be a slight, natural reflex at the outset that will dissipate within a couple of seconds. You should hold the pressure for such duration to allow the initial, natural reaction to dissipate. The horse that is not sore will show no reaction beyond a brief initial response. If he is sore, he will show an obvious reaction to the sustained pressure, even after 10 seconds. Where to begin:
If you tend position the points of the tree of your saddle (such as a jumping saddle) directly on top of the shoulder blade, begin probing there. Look for a fly-jerk reaction at the trapezius around your fingers. This is a natural reflex and will dissipate after about three seconds of holding. If the fly-jerk continues longer, the horse is bruised. If your horse is very sore, it initially will give the fly-jerk reaction and then step away, dip his back noticeably, bend his knees, or toss his head. It may literally go down under sustained pressure. If it is not bruised, the fly-jerk will dissipate, and he will relax and probably go on munching hay while you continue to hold pressure. Continue down the length of the horse’s back. Probe your horse’s back as described above for deep muscle soreness down the length of the back, anywhere the saddle makes contact. Most horses ridden regularly with a European saddle or saddles used for roping, barrel racing, or endurance racing will show some soreness where the arch or fork of the saddle rests on or behind the shoulders. Now check down the length of the back to the loins, or where the saddle ends. Some will be sore under the center of the panels, some at the rear of the panels. Probing the loins for deep muscle soreness.
It is easy to
confuse friction soreness with deep muscle soreness at the loins. The horse may
show a pronounced flattening of the croup and dropping of the back the instant
you start probing the loin area. Here is how to tell the difference between
deep muscle soreness from friction soreness. Continue to hold pressure to the
count of 15. If the horse continues to show pain or steps away from you after
ten seconds, it has deep muscle soreness at the loins. If, on the other hand,
it has friction soreness, the reaction should last only five seconds or so.
To palpate for friction soreness, spread apart your fingers and curve them as if you were playing the piano. With about three pounds of pressure, run your fingers down the horse’s back from front to rear, beginning on one side of the spine. Working your way down the horse’s side, test the entire area that the saddle touches. Also test the areas contacted by the flaps, fenders, stirrup leathers, and girth. The horse will dip its back, flatten its croup, or step away when you have passed over a sore area. Detecting spondylosis:
The test for spondylosis is simple. Beginning at the base of the withers, place three or four fingertips in line in the middle of the spine and press downward and hold. While maintaining pressure, slide your fingers toward the horse’s croup. No matter how hard you press, there should be no reaction! If the horse raises its head noticeably, dips its back, or tries to drop to the ground, it is suffering from spondylosis. A very sore horse will be able to tolerate only light pressure here before dropping his back or bending his knees. Spondylosis is extremely painful and the horse must be taken out of work immediately as the condition can create a very unpredictable, sometimes explosive animal. Eventually, the spine will calcify and fuse in a condition called ankylosis, which is nature’s way of alleviating pain and results in a stiff, non-athletic horse. Probing the rear of the scapula:
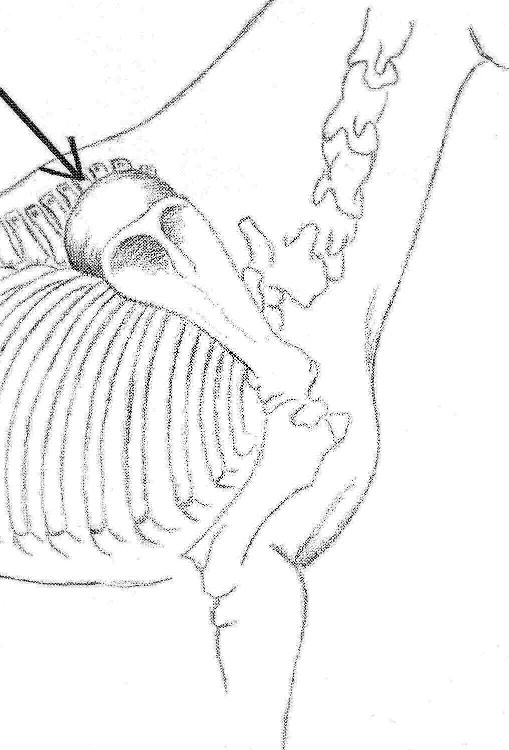
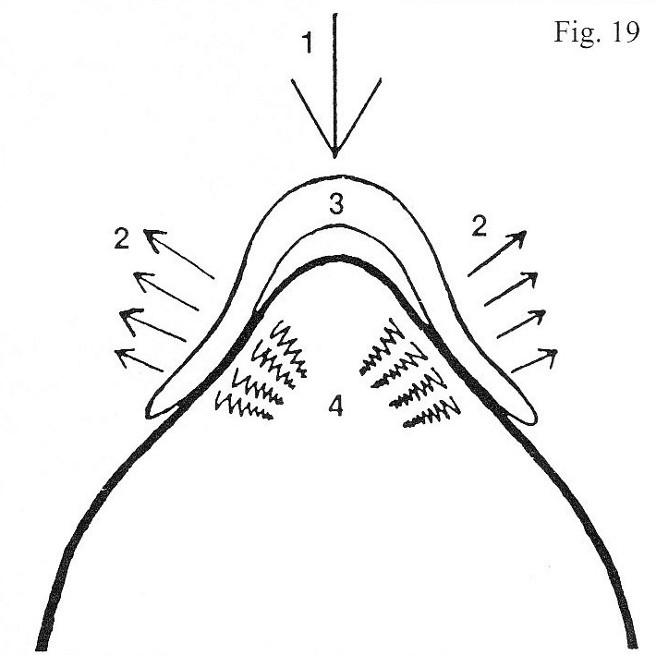
When the horse extends its leg forward, its scapula rotates up to six inches toward the rear of the horse. As it rotates, the scapula and cartilage of prolongation strikes or must squeeze under the arch or fork of the saddle. Padding does not mitigate the effects of the pressure against the cartilage of prolongation. It takes tremendous abuse when landing from a jump, during sitting trot, trotting downhill, during barrel racing, cutting and roping. When the horse is standing still, one cannot easily probe this extension of cartilage for soreness. Actually, the cartilage itself probably is not sore, but the fascia and muscle attached to it. The way to expose this area is to extend the horse’s foreleg. Have a helper elevate the front leg straight in front of the horse by the hoof as if it were in an extended trot. You will be able to see that the shoulder blade rotates five or six inches to the rear. Now probe the muscle just behind the bony part of the scapula. Horses whose withers do not show any soreness often show extreme soreness when the leg is extended—revealing why they cannot extend freely at the trot. Their scapulas are squeezing under or striking the arch of the saddle, preventing them from extending. Seven Saddle Design Features that Hurt Horses 1. Too-small weight bearing area. A 1930 study published in the Medical Journal of Australia established that the human skin and underlying issues can tolerate no more than 1.25 to 1.5 pounds of pressure per square inch before being damaged, depending on the individual’s blood pressure. While I am unaware of any similar studies on horses, a comparison could be made. Using a formula presented in an article in the September 1978 issue of Equus Magazine, one can determine if the average general purpose saddle has a weight-bearing surface in the panels large enough to keep the pounds per square inch under that 1.5-pound maximum. The contact surface of a 16-inch general purpose saddle has about 68 square inches. Surface area, here, refers to actual contact surface. The panels may measure slightly wider, but the rounded sides do not bear weight. Let us assume that it makes perfectly flush contact with the horse’s back, and that the rider keeps his or her weight in the seat and not in the stirrups, which would concentrate his weight over the rigid fork of the saddle. Now let us say the rider weighs 140 pounds. Using the equation presented in the Equus article, we must multiply the rider’s weight times two to take into account the concussion factor present at the bottom of the downward phase of vertical movement in the horse at a working trot. The rider’s weight becomes 280 pounds at the bottom of the downward phase of movement. Now divide 280 by the available weight-bearing surface, 68 square inches. The result is 4.12 pounds per square inch, almost three times the 1.5-pound limit given in the Medical Journal of Australia article. A well-fitted European saddle that does not have enough available contact surface area to displace the average rider’s weight will compress tissues (especially those close to bone) and limit blood flow to the muscle. Ridden too many hours a day, too many days in a row, the horse will be bruised and eventually the tissue will die, causing a saddle sore. If the horse is ridden only enough to suffer slight bruising that begins to heal every day, it may suffer behavior and performance problems with no visible pathology. I also would like to comment here about static weight. Mounted police horses, whose riders sit long hours, also suffer this compression. When the horse is ridden over distances, the rise and fall of the rider momentarily takes weight off the tissues and does allow some circulation to occur, except where there are pressure points at the shoulder. The compression is continual on horses that must stand under the rider’s weight over long periods, much like a bedfast patient. Pressure points are a problem for police horses. 2. Saddles concentrate the rider’s weight over the front one-third of the saddle. The majority of the rider’s weight and concussion is transferred to the horse’s back through the rigid arch and leading one-third of the saddle. Much less is transferred through the panels unless the rider is seated. This is because the stirrups are hung from the unyielding steel arch of the saddle tree. There is no other structure on the European saddle tree from which to hang the stirrups, because as saddles evolved over the past century, the tree became very narrow behind the arch, preventing attachment of the stirrups more toward the center of the seat. Hence, the stirrup hangers are attached to the points of the arch and extend rearward no more than two inches from these points. 3. The withers are an arched surface and cannot bear the weight of the saddle arch without being pinched by it. The arch of the saddle rests on either side of the arched withers, or shoulder area. Even if both of these arches have precisely the same angle, pinching must occur because the arch is bearing weight. Pinching would not occur if the arch could rest on the top of the withers. Obviously this could not be allowed because the top of the withers would be damaged. However, if the apex of the arch could rest on top of the withers, and the two angles matched, no pinching would occur.
Once one understands this important point, the question of whether the arch is wide enough for the withers becomes a moot point. Regardless how wide or narrow the arch, if it is bearing weight on an arched surface, it will present a squeezing, shearing force. Whether this squeezing action takes place higher or lower on the sides of the withers or shoulders depends on the width of the saddle’s arch. The only answer to this dilemma is to move the saddle away from the shoulders and allow the entire length of the panels to bear the rider’s weight evenly. The rider must spend most of the time sitting in the seat so that the arch is not forced to transfer the burden to the withers and shoulder area. 4. Most riders expect too much from the stuffed panels of their saddles. Today’s saddle panels are not designed to be stuffed to fit the horse. At best, they provide a layer of padding between the metal bars of the European saddle tree and the horse’s back. The tree must first “fit” the horse. By fit, I mean that it should rest behind the moving shoulders with an even contact area when placed bare on the horse’s back. There should not be a gap between the horse’s back and the underside of the panels in the center, and the saddle should not rock on the horse’s back. Stuffing in the panels must be an even thickness and firmness from one end of the panel to the other. This is the first rule of flocking panels properly, because it ensures that the stuffing will not shift and become lumpy. Thus, one cannot arbitrarily choose to stuff a panel thickly here and thinly there to fit a particular horse. From a mechanical stand point, that will not work. Likewise, one cannot choose a small, narrow tree and attach large, stuffed panels to spread out the rider’s weight better. Here is why: Trees are designed narrowly to place the rider’s thighs closer to the horse and prevent spreading the rider’s legs apart. If a saddler decided to expand the weight-bearing area of the panels by attaching wider panels beneath these bars, the panels would simply stick out and bend upward around the edges, due to opposing pressures from the horse and rider. A roomy panel could not be attached to contemporary European trees in any case, due to their design. It truly is the shape of the tree that determines the shape and fit of the panels. Not the other way around. 5. The seat shape you choose determines the bar shape of the tree, and tree shape determines how the saddle fits the horse.
You cannot ride a very straight-backed horse and choose a very curved, deep-seated saddle and expect it not to be too curved for the horse on which it is being used. The result will be excess pressure in the center of the horse’s back and rocking of the saddle. Imagine the effect that would have on the horse’s ability to round his back. The more secure, deep seat has become quite popular in dressage. Unfortunately, most horses have not responded by changing the shapes of their backs to match popular saddles. What saddlers have been forced to do to accommodate the difference between the rider’s desire for deep-seat security and the flatness of the horse’s back, is to add gussets to the rear of the leather panels. The saddler then is able to fill the rear of the panels up to six inches tall with stuffing to prop up the rear of the saddle and to take curve out of the underside to prevent the saddle from rocking on the horse’s back. As you will read, this creates a new problem. 6. Overstuffed panels present special problems: There is a funny thing about over-stuffing anything. The more stuffing that is put in, the rounder the shape becomes. Imagine stuffing a rectangular sofa cushion. Once you reach a certain point in stuffing it, you have added all that is possible while maintaining a rectangular shape. If more is added, it simply blows up like a balloon. This is why sofa cushions are not filled with flocking, but with rectangular pieces of foam. The same is true of saddle panels. If they are to mirror a horse’s back, they must not be stuffed to an extremely rounded shape. A round surface has a much smaller weight-bearing area than a flat one, so the experienced saddler who hand-stuffs the leather panels carefully, one layer at a time to achieve an even thickness, is presented with a very difficult problem if he must deeply stuff the rear of the panels to keep a deep seated saddle from rocking: The stuffing will eventually shift and become lumpy, and it will produce a narrow, rounded weight-bearing surface. After saddles have been ridden long enough, many feel crooked. If the panels are carefully palpated, one often can discover that the panels have settled and one is actually thinner than the other, throwing the saddle off to the side. These problems did not exist in and before the 1800s when horsehair or straw was used for panel stuffing. The panels were generously wide (reflecting the more sensible size and shape of trees of the day) and they were hard, because the packed straw or hair was designed to provide solid support. 7. Re-flocking usually doesn’t help. Riders are often advised to have their saddles re-flocked once per year. Re-flocking is only advisable if the horse is present at the time of re-flocking and the rider and saddle are placed on the horse’s back for reference during the process. It only is advisable if a saddle fit problem is present, and only if re-flocking will help. There are some negative results produced from re-flocking saddles. First, it is very difficult to add more flocking without producing lumps. Second, each time stuffing is added, the panels become more rounded, resulting in a smaller weight-bearing area. Third, when the leather of the panels is stretched by re-flocking, it loses its resilience. It is nearly impossible to reclaim its original shape. If more stuffing is added in one area to fill out a depression, the leather in that area becomes stretched more than the rest, and the compression of riding will have an effect on the new stuffing added to that area. The rule of keeping an even thickness of stuffing throughout the panels must be adhered to in order to prevent lumps and also crookedness caused by one panel becoming more compressed than the other. Properly stuffing a panel is a difficult, tedious process which takes years to learn to do well. In quality saddles, wool flocking is inserted into the panels, one layer at a time, using a long, specialized tool, until an even thickness of stuffing is achieved throughout. In some saddles, even expensive ones, other materials such as cotton scraps and what is called wool shoddy, is used to flock the panels. These materials sometimes make for more lumpy panels once they are compressed with use. One British saddler recently stated that there is not enough leather in the panels of modern English saddles to allow you to add additional depth in the panel to fit a particular horse. If your horse has a deep back, according to him, you would not be able to deeply stuff the center of the panels to better fit your horse. To custom fit a horse, one must cut new leather panel patterns, then stuff to fit. Routine flocking can only help re-balance the saddle according to this saddler (raise or lower the front or rear to make it level). This must be done regularly, with the horse present. Center of Gravity: The Myth The single most harmful “advancement” man has introduced to the art of horsemanship is the forward seat. The term actually is a misnomer for the technique created by Italian cavalry officer, Frederico Caprilli, in the late 1800s and later expanded by his student Count Elias Toptani. If the two had ever known that several decades later, riders would misconstrue the meaning of forward seat and interpret it to mean that they should sit as close to the withers of the horse as possible, the masters would have been horrified. Riders should not attempt to sit directly over the horse’s so-called center of gravity (that they envision to be just behind the withers), because it is physiologically harmful to the horse’s soundness. Who invented the forward seat? While Caprilli and Toptani discovered the concept of sitting forward during certain phases of the jump, it really was flat track racing that validated the idea that sitting forward on the horse’s back was beneficial. The forward seat was never invented to prolong the soundness, balance, and usefulness of the horse. It was created to make horses run faster on flat race tracks and in my opinion has been hurting horses ever since. Willie Shaw, a Black American jockey, arrived on British soil in the late 1800s and started winning races by adopting a riding position that nearly got him laughed off the tracks. Shaw and his more dashing contemporary, Todd Sloan, got the last laugh. Shaw had shortened his stirrups, crouched forward over the horse’s neck, and pulled on the reins. His horses ran faster, because he was competing against jockeys who still were riding upright in the center of their horses’ backs, using long stirrups, reminiscent of 19th century hunting paintings. What had Shaw discovered? He had disturbed the equilibrium of the horse. What Shaw did to those race horses is what happens to you when your child sits on your shoulders and then leans forward. You must step forward to catch up with your center of gravity, because the weight of the child has forced it ahead of you. The same thing happens when you begin to jog downhill and you start going faster and faster until you feel you are out of control. Your center of gravity is in front of you, just as it was ahead of the horse running down the mountain in the movie, “The Man from Snowy River.” Shaw and Sloan wanted the horse’s center of gravity out in front of it as far as possible, because this would force the horse to reach out with his front legs and run faster in order to keep from falling face-first into the dirt. Then these new-age jockeys took the technique a step farther. They utilized the horse’s tendency to pull against the bit. By this method, they were able to force the horse’s weight to the tip of its nose, from the jockey’s weight over the withers, through his arms, along the reins, all the way to the bit in the horse’s teeth. Caprilli was watching all this from the sidelines, and he experienced a flash of insight. He could incorporate this “ridiculous monkey seat” into his jumping experiments. Caprilli’s mentors rode upright with taut reins and long stirrups as did jockeys of the day. When trying to perform what they considered the very unnatural act of jumping on horseback, they rose in their stirrups, leaned back, and heaved the heads of their horses upward by brute force. Caprilli, on the other hand, developed a very natural, long-rein style of riding. This new idea of leaning forward might just complete his technique for jumping. Caprilli only adapted the forward seat in small part. His jumping saddle still was positioned well behind the moving shoulder blade; he knew the shoulders would be impinged and damaged otherwise. He leaned forward at the opportune moment to help the horse jump. Caprilli never meant for saddles and riders to be moved forward, according to the few personal notes he left behind. He certainly did not advise riders to sit anywhere but between the horse’s columns of support—his legs. What and where is the horse’s center of gravity?
When a horse is standing square and still with a natural head position, his center of gravity is probably near this center of mass. Those unfamiliar with physics like to visualize this point as some sort of geographical balance point over which the rider should position himself to help keep the horse in balance. As we shall see, if you add your weight over this illusive center of gravity when it is in the same position as the center of mass, you automatically move it forward, creating instability of equilibrium. Why the forward seat is harmful. A forward position overworks the loins and tires the forehand. Ben K. Green, DVM, in Horse Conformation as to Soundness and Performance, says this about the forward seat: “I have listened in silence to the advocates of the forward seat for the last 20 years. I have seen and treated sore, stiff shoulders that have come to be that way apparently without cause. Knees have become less useful and more subject to breaking over, causing the horse to fall, without any apparent explanation. Ankles and pastern joints have taken an ever constant beating and produced wind galls on what otherwise might have been a durably sound horse. This position of riding has been advocated by so-called horsemen who are literally without knowledge of the anatomy and mechanical functions of a good horse.” Out of ignorance, we modern horsemen strive to stay over this pinpointed center of gravity that we believe is below a point aligned just behind the withers. The reason this does not work is that the moment the horse takes a step, its center of gravity begins to shift. The horse may do many things to hold it in balance within his body—between its columns of support. It may raise his head, tuck its hindquarters, contract its abdominals, extend its gait, or other muscle contractions to maintain its balance. The horse’s center of gravity constantly is on the move. It long has been understood that more of the horse’s weight is carried by his forehand than his hindquarters due to the extended head and neck and its cantilever effect on the body. Adding weight closer to this forehand automatically moves the balance point forward. Now the forelegs, with their vulnerable suspensory apparatus, must bear even more weight. The horse responds to its center of gravity being moved forward by the rider by raising its head. The act of raising the head usually causes the horse to hollow its back which renders him less able to carry the rider’s weight without damaging his spine. There is no turning back now, because European saddles now are constructed so that they can only be girthed and ridden in this forward position. The placement of the rigging to which the girth attaches, by its design, pulls the saddle forward against or onto the shoulders. The only way to add weight to a horse’s back and allow him to maintain his natural balance point is to add your weight evenly between the horse’s columns of support. Riders fear the span of the horse’s back cannot bear their weight. Tell riders today that they should sit in the middle of the horse’s back, and they often gasp, “The horse’s back isn’t capable of carrying weight in the middle!” This is a false assumption. Indeed, the horse’s back was not intended to carry weight; however, between the eighth and 18th pairs of ribs a saddle may rest safely on the horse’s back and bear weight, provided it fits evenly. Vertebrae 1-7 are covered by the scapulas on both sides that we already know should not be interfered with by the saddle so they may move freely. Behind the 18th pair of ribs, the last pair, are the long, thin processes which extend outward horizontally from the vertebrae in the area we call the loins of the horse. Some riders feel that the ribs in the middle of the back are not capable of bearing weight, because they do not attach to the sternum of the horse as do the first eight pairs of the ribs. Since many riders refer to these 10 pairs of ribs as false ribs, riders think they are unable to bear their weight. If this were true, one would have to ride a racing saddle and literally perch over the withers if one were to stay off the false ribs. To lighten the forehand, remove your weight from it. The horse must lighten its forehand in order to collect itself even slightly. It must raise its head, contract its abdominal muscles, tuck his hindquarters, and step well underneath itself in the rear to round and lighten its forehand. The gluteal muscles play an important role in lightening the forehand by working together with the hindquarters and the longissimus dorsi muscle running down the length of the back. The horse’s gluteal muscles (rearing muscles on the top of the hind quarters) use leverage to help lift the forehand. To understand how the rider’s weight affects this leverage, think of the horse’s back as a short, strong tuna fishing rod. The horse’s gluteals are like the fisherman’s arm raising the pole. The rider is like a moveable weight fastened somewhere along the pole in front of the fisherman’s hand. The butt of the pole at the fisherman’s stomach is like the horse’s sacrum—the anchor for the gluteals. If we slide the weight out toward the end of the pole, the fisherman will have to work much harder to lift the pole. If we slide the weight back toward the lifting hand, the fisherman will raise the end of the pole much more easily. So it is with the horse’s loins when we sit as far forward as possible away from the loins. They must work much harder to lift the forehand, and they will tire more easily and quickly than if the rider is sitting toward the middle of the horse’s back. This tiring of the loins isn’t just a minor inconvenience; it throws the horse and rider’s weight onto the forehand. This is exactly what happened in flat track racing when the forward seat was first adopted. By the end of long races, horses were “hobby-horsing,” pumping their way up and down across the finish line, instead of running smoothly. This fatigue caused injuries. Foreleg injuries became more prevalent, and eventually races were shortened from four miles to one and a half or less. Today, the majority of race horses will have foreleg injuries before the end of their careers. Endurance racing horses will as well, until long-distance riders reject the common practice of standing in the stirrups and hovering over the forehand to “get the weight off the horse’s back.” Distance Riders should sit down. Competitive trail riders may be the most conscientious of all riders. Unfortunately, many of their horsemanship judges still believe that riders should hover over the horse’s so-called center of gravity. In the United States, some judges give riders higher scores for standing in the stirrups, instead of learning how to sit and post properly. Not only do these riders cause their horses’ backs and loins to tire quickly, they overload the forelegs of the horse, making them more susceptible to injury. It is physically impossible to take weight off the horse’s back by standing in the stirrups unless one is attached to a cloud by a rope. Instead of placing weight in the free-span of the back where it is capable of bearing weight, they place it over the arched shoulders. The flat part of the back is a reasonable load bearing surface, from an engineering standpoint, while the arched withers area is a poor place to put weight, because an arched surface cannot bear weight without experiencing shearing downward forces. Most serious endurance riders have come to realize these facts. Good competitive trail riders do as well. Poor sitting and posting also are hard on the horse, but I believe that sitting and posting poorly are still better than standing in the stirrups for mile after mile. Proper placement of the rider’s weight—the kidneys are safe. Among many riders, the terms “loins” and “kidneys” are synonymous. This is not true. The kidneys are at least four inches below the surface of the back, below the long, transverse processes of the lumbar vertebrae and underneath the thick muscle known in other animals as the tenderloin. Direct pressure from a saddle above the kidneys would not cause kidney damage, per-se. The main reason riders try to keep their saddles forward is that they are convinced that if the rear of the panels come anywhere near the loins of their horse that they will damage the horse’s kidneys. It is far more likely that muscle damage from pressure points, and interference with major nerve meridians along the back will harm kidney function more readily than any direct pressure from the rear of the saddle. In Conclusion To determine if your horse is performing to its highest potential I ask you to question your saddle and your riding. Assess your horse’s behavior using the guidelines in this article. Look at your saddle on your horse’s back with no pad. Reach underneath to determine how well it makes contact. Sit on your saddle with no padding. Place your fingers up to the second knuckle under the arch of your saddle in front while there is no pad in place and have a friend lead your horse. How do your fingers feel? Are your knuckles pinched by the rotation rearward of your horse’s shoulder blades? Reach under the rear of the saddle and see if there is excess pressure on your fingers or lateral rubbing. I also ask you to palpate your horse’s back as directed for deep muscle soreness and other telltale areas of spasm. Depending on what you learn from your horse’s behavior, soreness and saddle assessments, there may be products on the market that will help you. Where performance and behavior problems were concerned, the saddle and the rider’s weight and concussion have been invisible for too long. When horses have trouble rounding, extending, and bending in dressage, the cause is likely to be pain from the saddle. When horses are no longer able to slam on the breaks in roping, cutting, and barrel racing, it is likely the saddle’s fault. When horses refuse jumps or continually knock them, it is likely to be due to the horse’s dread of the saddle jamming its scapulas when it lands. When trail horses become hard to catch, won’t walk calmly with their heads down, and cannot travel downhill in a straight line, it is very likely that they are trying to evade pain from their saddle. The saddle is a structure made for the convenience of man. We must remember that and look at the saddle for what it is: a rigid piece of equipment that generally works against the natural movement of the horse. |
|
© COPYRIGHT 2001 - 2014
|